***Please note that a new version of this pattern is now available here. ***

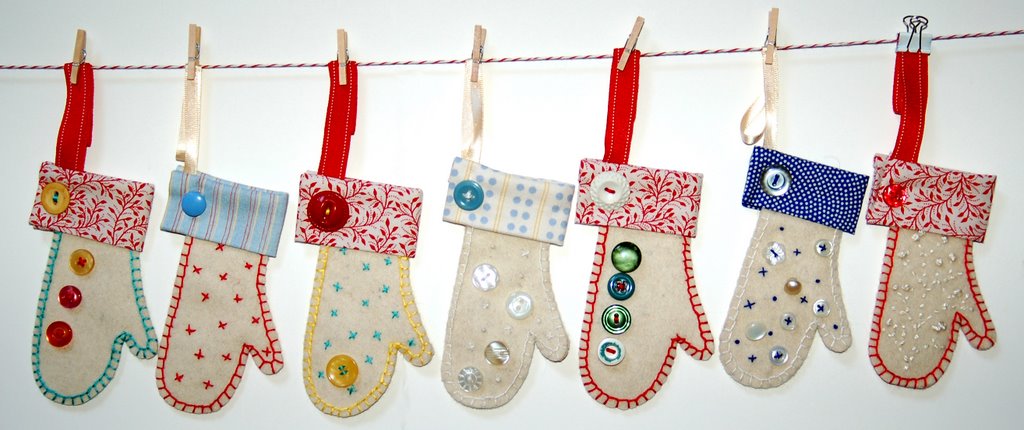
Thank goodness Todd answers requests for online support. It's not exactly what I had envisioned, but I've finally managed to post the instructions and pattern for the mitten ornaments: page 1 and page 2. If you right click on the images and select "save picture as," you can print the files in a reasonable quality. Sorry that printing the pattern is more complicated than I had hoped.I've also created a Flickr set with
photos and instructions showing each of the steps in case my written instructions aren't clear.
If you make an ornament and would like to share it, I've set up a
mitten ornament group on Flickr. I'd love to see what you've made. Cheers!

Thank you so much for creating this pattern for everyone to enjoy. I love your mittens and look forward to trying my hand (who could resist that pun!) at them:)!
ReplyDeleteSuch a very nice tutorial!
ReplyDeletethis is great! thank you for sharing.
ReplyDeleteThank you for doing all that work to get us the pattern. One of the main reason for me to start a blog was so that I would learn how to use the computer better. Glad you are learnig too, I feel less alone.
ReplyDeleteVery cute.. I am going to link to them on QuiltersBuzz.com Thanks for the posting the instructions and great photos.
ReplyDeleteGina
this pattern is great! I can't wait to try it out--thank you for putting it on your blog.
ReplyDeleteSo cute! I love their combination of old style and new styling. Thanks for sharing!
ReplyDeleteThese are adorable. I think I was thinking mittens at the same time as you -- maybe you had mentioned this some time ago and it stuck in my head? I don't know. I spent last Monday making a mitten garland -- not quite ornaments, but same idea. Yours are lovely.
ReplyDeleteThese are darling-thanks for the pattern! I see myself making lots of personalized mittens for my neighbors...which is great, because I've been wanting to do something, but everything I'm thinking of isn't really practical for so many people. Thanks!
ReplyDeleteVery sweet! Thanks.
ReplyDeleteyour ornaments are so cute!
ReplyDeletei'm definitely using this idea for next year!
ReplyDeleteI know this is sort of out of the blue but I found a magazine clipping that someone had cut out and it was this mitten ornament. I kept the scrap of paper and decided to try and make something like it for Christmas. Well, my first attempt failed and I ran out of time to try again before Christmas. Anyway, today I happened upon this post and was so delighted to find the instructions. Thank you, they are so great, I can't wait to make them!
ReplyDeleteSomething a bit off topic: You have a new header pic! Great! We've got a very similar puzzle here - it's great fun combining the different pieces.
ReplyDeleteVery good idea as well to use them this way.
Diana
grazie li ho provati...
ReplyDeletehttp://img291.imageshack.us/img291/8930/scambio006bi4.jpg
this is my thank you for tutorial...
Maria
Thankyou for the lovely little tutorial..I made a couple today and they turned out really sweet.
ReplyDeleteMelx
Love this...thank you for taking the time to bless us with your tutorial. I am going to make a few of these for next years tree, as I only have 1 day left until Christmas.
ReplyDeleteMerry Christmas!
Kimmie
mama to 6
one homemade and 5 adopted
come meet us if you get a minute sometime ;-)
thanks so much
ReplyDeleteBy the way...just took the class on the backpack at Alewives in Newcastle, ME...loved it.
ReplyDeletedear liesl,
ReplyDeletethanks for this great idea and the tutorial. i love it.
and therefore i created a link to your posting in my blog.
if you don't want me to set the link please leave me a comment and i will delete it.
bye, doro.
Hi! I'll have the one I used up Monday on my blog. Thanks for the great idea!
ReplyDeleteI love your mittens!! I am working on some right now, and I so appreciate your tutorial. Thank you!!!
ReplyDeleteWhat a fun ornament! Would you mind if I linked to your pattern from my site, www.AllFreeHolidayCrafts.com? Let me know...
ReplyDeleteThanks!
-Rachel