And then let me also give you the usual reminders:
1. Click on any photo/drawing for a larger view.
2. Notes on the photos will pop up if you hold your cursor over the photo.
3. If anything is confusing, please leave a comment or send me an email and I will do my best to clarify.
4. See the previous posts: The Skirt, Getting Started (part 1), and the "Un-"Waistband (part 2).
So here we go:
1. Put on the skirt and have someone help you mark the hem. Note that the hem on an A-line skirt is slightly curved, not straight as it would be on a pencil skirt. The best way to mark a hem like this is to measure from the ground up, all the way around the skirt. Wear a pair of shoes that you will wear with the skirt so that your posture is the same as it will be when you wear the skirt, since the height of a heel can throw your weight differently.
2. Take off the skirt and draw the curve of the hem directly onto the fabric using chalk or some other temporary marker. Fold your skirt in half and mark the center back as well. Check the hem you have marked and correct any wavy lines. Then remove the basting stitches from the side seams so that you can work with the back hem separately from the front hem.
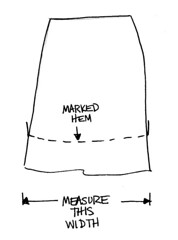
3. Use a ruler or a strip of paper to find the width of the back hem from side seam to side seam. Then fold or divide this measure by an even number: I divided mine by six. This will be the approximate width of each scallop.
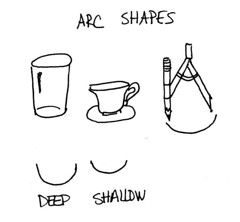

4. Find or draw an arc shape to use as your scallop edge. You might use a glass, a bowl, or you could use a compass to draw an arc. You don't have to use a full semi-circle; you could use just a portion of the circle for a more shallow arc shape. Once you have an arc shape you like (and which is the correct width for your measurement in step 3, above, trace it onto cardstock and mark the top corners of the scallop carefully. Mark the center of the scallop as well. Cut out the shape of your scallop: this will be your template.

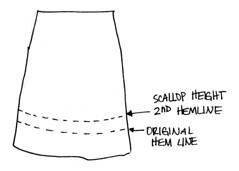
5. Measure the height of your scallop, from the bottom of the curve to the corner. On your skirt, draw a line this high above your original hem line. This will be the line that you use to align your scallops.
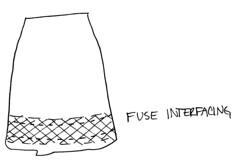
6. Fuse a piece of interlining to the inside hem of your skirt, covering the two hem lines you have drawn and extending slightly above (at least 1") and below the two hem lines.
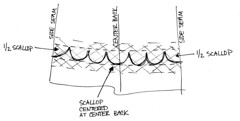
7. Now you'll need to transfer your two hem lines onto the interlining side of the skirt fabric, where you'll also be drawing your scallops. To do this, you could poke a pin through the hem lines at regular spots, and then rub your chalk over those places where the pin comes through on the inside of the skirt/interlining. Redraw the hem lines at the inside of the skirt, and then you can start drawing your scallops onto the interlining. Start lightly, since you will probably need to do some adjusting. Use the top hem line you have drawn to align the top of each scallop along the curve of the hem. Use the center line you drew on your template to mark the scallops at the side seams, which should each be half of your scallop shape, and the scallop at the center of the skirt should align with the center line on your scallop template. Note that the lower edge of the scallop curve should align with the placement of the front hem when you reach the side seam. Adjust if necessary.
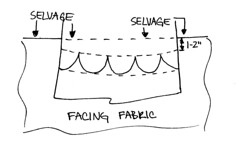
8. When you are happy with your scallop shapes, cut a length of fabric to use as your facing. You can use the same fabric that you used for your skirt, or you could use a contrast fabric if you want a little color on the inside of your scallops - just for fun. I used a piece of natural-colored lightweight muslin for my skirt. Cut your facing along the length of the fabric so that the selvage edge will become the top of the facing. This saves you from a bulky seam that might show through on the outside of the skirt.
9. Pin or baste your facing fabric to the outside of the scallop hem, aligning the selvage edge an inch or two above the top of the highest scallops (the scallops nearest the side seams). I found it worked best to baste the fabric at the top and bottom so that it did not slip as I was sewing.
10. Sew your scallops, following the lines you've drawn.
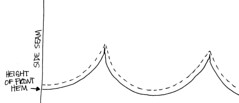
11. Press the scallops flat to set the stitches. Then trim around each scallop, leaving a scant quarter-inch seam allowance. Snip into the corners between the scallops very carefully; you want to clip as close to the stitching as possible without clipping your seam.
12. Un-pin or remove the basting from the facing and turn the scallops right side out. Open and press each curve individually, making sure that the seam is opened and the curves are smooth.
13. Once you're happy with the scallops, smooth the facing and skirt hem and baste the facing to the skirt at the side seams. Then you can sew the side seams of the skirt, catching the facing in the seams.
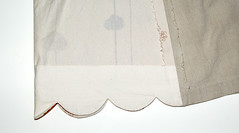
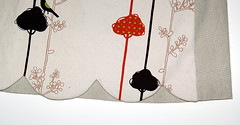
14. Blindstitch the selvage edge of the facing to the inside of the skirt fabric. Catch a few threads of the skirt in each stitch so the facing doesn't hang down or flap around when you are wearing the skirt.
15. Hem the front of the skirt along hemline you drew.
And you're done, at last!
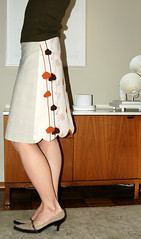
I would love, love, love to see completed garments. Please send me photos, and I will be happy to post them if you will permit me to do so.

Wow, great instructions! Thanks! (Gorgeous skirt too.)
ReplyDeleteWow what a brave girl you are! That looks scary , well illustrated and detailed but still very scary!
ReplyDeleteyou rock!
ReplyDeletei wish i could get to making a scallop edge sometime in the near future, but i doubt it...am bookmarking this for safe keeping!
once upon a time in high school i bought a scalloped hem skirt pattern and some wonderful shiny grey fabric that i planned to make the skirt of. i never actually made the skirt, but i'm sure the pattern and the fabric are still somewhere in my Mom's fabric stash. sometimes i still think about making it now, ten years later!
ReplyDeleteThanks for posting the instructions. I feel too intimidated to try it now. I will have to think about it.
ReplyDeleteI love your skirt ... I'll just take yours! You look to be about my size! Thanks again.
Wow - I will try not to freak out, because I'm sure its just like with knitting, sometimes all the directions are overwhelming but if you take it just one step at a time it is doable. Connie
ReplyDeleteWow -- this was a lot of work for you to put together, Leisl. What a gift for everyone. Lovely.
ReplyDeletethis is fantastic! Thanks for all the work and the beautiful blog.
ReplyDeleteThat is the cutest, chicest skirt I've seen in a long time! And it makes my eyes well up with tears to see someone sewing, really sewing, not just turning a t-shirt into a skirt :') I fear we may be a species on the verge of extinction.
ReplyDeleteescheva
[found you via whipup.net, if you're wondering :)]
It's beautiful! And the shoes are just perfect!
ReplyDeletethis skirt is amazing!! i'm inspired to head to my machine immediately!
ReplyDeleteThank you for this! This totally helped me with making a scallop hem on a pair of shorts. I wrote about it on my blog: http://maryvannote.com/blog/2010/05/02/mary-van-scalloped-shorts-daaamn/
ReplyDeletethanks for your tutorial! i used it to hem a dress i made and it turned out really well.
ReplyDeletehttp://makesomething.ca/2011/02/20/stylish-dress-book-dress-s/
I love the print. And the length of the skirt is just right for the scallop helm to look sweet.
ReplyDelete