
1. Click on any photo for a larger view.
2. Notes on the photos will pop up if you hold your cursor over the photo.
3. If anything is confusing, please leave a comment or send me an email and I will do my best to clarify.
Ready?
Ok, so you've got your skirt cut out, the top of the skirt staystitched, and you've checked the fit and trimmed your seam allowances as needed (see Tutorial #1: getting started). Now you can make the facing for the "un-"waistband.
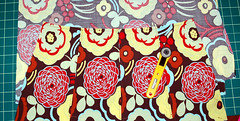
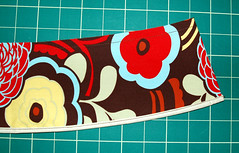
1. The facing will be identical to the top 3 1/2" of your skirt with the seam allowances. Pin the top of your skirt to another piece of fabric that is as wide as the skirt top and about 5" or 6" high. Cut out the fabric at the top and sides. Then unpin the skirt from the fabric and use a ruler to measure, mark, and cut the bottom of the facing 3 1/2" from the sewing line at the waist.
Make one facing for the front and one for the back.
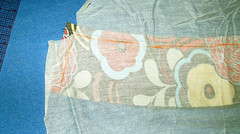
2. Then use a warm iron to gently fuse interfacing to the wrong side of the facing. Just touch the tip of the iron to the interfacing in a few places; you don't want to completely fuse the interfacing to the fabric yet.
3. Let the fabric cool, and cut out the interfacing to be the same size as the facing. Then, before completely fusing the interfacing to the facing, trim the seam allowances of just the interlining. This way you won't have extra bulk at your seams. (You can see in my photo that I did this all in one step. Sorry - sometimes I cheat. If you can see through your interlining, you can do it this way too.)
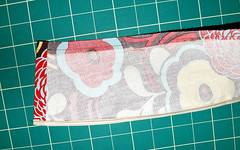
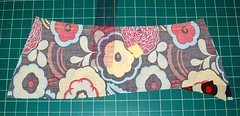
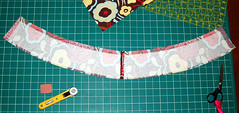
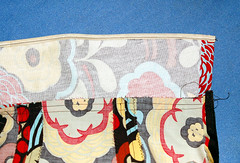
4. Now you can fuse your interlining to the facing. Then staystitch the waist of the facing, sew the side seam of the two facing pieces together (remember: the right side of the facing fabric will be facing the inside of the skirt, so be sure to sew the opposite seam than the side seam of the skirt where the zipper goes.), and turn under and press the seam allowance of the open side seam. Then finish the bottom edge of the facing. I usually cut some bias strips of a lining fabric like China silk or Bemberg lining and make a French binding, although on this example I was in a hurry and used a piece of pre-cut, pre-folded packaged bias strip that was handy. (I didn't even change my thread color to match the binding! Don't be lazy like me.) (This is an interesting way to finish your facing as well, although I've never tried it.)
5. Now you can insert the zipper at the side seam of the skirt. If you've never sewn an invisible zipper or need a refresher, here are some very good instructions. I've found that using the proper invisible zipper foot on your sewing machine makes all the difference, and if you still have trouble or are unsure of yourself, BASTE first. (That's my motto most of the time: when in doubt, baste.) When you sew the zipper, be sure to align the top of the teeth just below the sewing line at the waist. When the zipper is closed, the top of it should end at the waist seam. If you don't have an invisible zipper foot for your machine, you could also hand sew the zipper.
6. After you've inserted the zipper, sew the side seams of the skirt until you're about 12" from the hem. Don't sew all the way down the side seams: baste the bottom part of the seams, because you will need to rip this part in order to sew the scalloped hem.
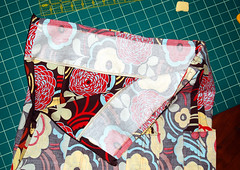
7. Now it's time to finish the waist and facing. With your skirt inside out, pin the facing inside the waist, right sides facing each other. Match the side seams, and note that the folded ends of the facing should line up with the zipper edge of the skirt, covering most of the zipper tape.
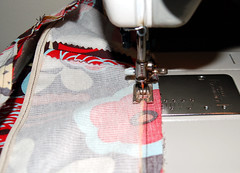
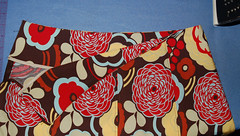
8. Sew your waist seam, and then press the seam allowances and the facing away from the skirt.

9. Edgestitch the waist seam on the facing side, catching the seam allowances in your stitching. By sewing the seam allowances to the facing like this, you'll force the body fabric to curve over the edge of the skirt at the waist, and the facing won't show when you're wearing the skirt.
10. You're nearly done with the waist! Turn the skirt right side out and fold the facing back into the skirt. Press the facing into place, and then slipstitch or blindstitch the edge of the facing to the zipper tape. It's also a good idea to tack the facing to the opposite side seam, just to keep it in place.
And that's it - you're done!
On a side note: You may have noticed that my photos do not show a classic a-line skirt like the Scalloped Hem Skirt. You'll see some extra seams in the photos because I'm making my sister a pleated skirt. (I'll post a photo or two once the skirt is hemmed.) But the method is completely the same, so don't get confused by those seams: you can make this facing for any skirt. Just be aware that if the skirt has darts or other seams, you need to sew those seams and darts closed in order to get the correct shape of the skirt before you trace the top of it for the facing. Let me know if you want another tutorial on this. It's quite simple, once you see how it's done.
Next: how to make the scalloped hem. I'll be back in a few days with the instructions.
i bought a purse in Manila about two years ago. it was the exact same material that you are using. now i have the create and barrel catalog...its in there too (as napkins).
ReplyDeleteThanks again for your instructions, I'm still waiting for my fabric (sis boom from flappergirlfabrics.com) - can't wait to get started!
ReplyDeleteThank you so much! And your links to other help is greatly appreciated. My only confusion on the tutorial was (I think) you are using "interfacing" and "interlining" interchangeably. They are the same, right?
ReplyDeleteAgain, thanks for your generous sharing of your expertise and time.
I'm excited! Thank you for the tutorial.
ReplyDeleteThis is a great, clear and helpful turoial Liesl - I love it when people demystify sewing techniques! So often I find that I am just so used to doing something that it can be hard to explain to a novice without making it seem more complicated than it is! Trying to pack 30 years of sewing experience into one lesson!!
ReplyDeleteThe alternative way to finish the facing you linked to (another interesting way to finish) is what we call 'bagging out' - is this what you call it too? I have always bagged out when making an un-waistband skirt, or a skirt on a yoke.
I noticed the napkins, too. I don't think I've ever seen quilting fabrics used in so many places before!
ReplyDeleteMartha, interlining and interfacing are the same thing. Sorry for the confusion.
And Sooz, I've never heard the term "bagging out" used for anything other than inserting the lining in a jacket, but it makes sense for the uses you mentioned. I suppose it could also be applied to sewing the collar and cuffs on a shirt or blouse. Very interesting!
Thank you for taking the time to put these tutorials together. I'm really looking forward to stepping outside my comfort zone a bit and improving my sewing skills.
ReplyDeleteI have the same fabric! :) Love it! I plan to use it for a quilt though... Maybe a skirt? Hmmmm...
ReplyDeleteThank you so much for posting this tutorial. I'm obviously coming in a little late, but I want to make a scalloped skirt for my daughter and this is just the inspiration and guideance I needed to get started. Now I think I'll have to make one for me to wear to the park too.
ReplyDeleteTHANK YOU SO MUCH! I bought a simple a-line skirt pattern (never done this before) and managed to get the skirt done no problem, The pattern's waistband was SO confusing. I looked online and found your tutorial. It was so easy to follow and my skirt looks great! Thanks!
ReplyDelete