1. Start by drawing a shape for your applique. If this is your first time doing applique you might want to try a simple geometric shape. A heart would be a great way to practice straight edges, curves, and both a point and an inverted point.
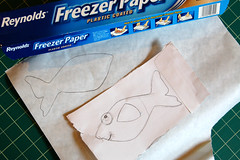
2. Copy your shape onto freezer paper. It is easiest to draw on the dull side of the freezer paper. Note, however, that the shiny side will face up when you make your applique, so be sure to reverse the image so it looks the way you want it to on the shiny side of the paper.
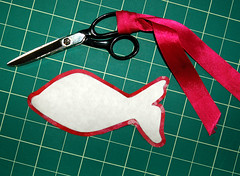
3. Then cut out the image along the edge and iron it, shiny side down, to the wrong side of the fabric you will be using for your applique. Your iron can be quite hot for this, but be sure to turn off the steam setting. The shiny plastic side will adhere to the wrong side of the fabric, making it easy to fold the seam allowances around the shape of the applique.
Once the freezer paper has bonded to the fabric, cut out the fabric leaving approximately 1/4" seam allowances. This doesn't have to be exact, since the freezer paper will guide you as you create your applique. I like to leave my seam allowances a little bit wider than 1/4" because the fabric tends to fray a bit as you are working, but as I reach tricky curves and corners I'll clip and trim the seam allowances as necessary.
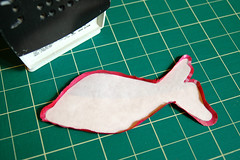
4. It can be helpful to press your seam allowances to the inside before starting to sew the shape, but I don't usually spend a lot of time on this step. I think it's easier to fold the fabric under as you are sewing it. Other people's opinions differ on this step. I've read suggestions to use starch or glue stick to help keep the seam allowances in place before stitching, so you may want to try one of these other methods as well.
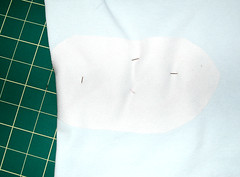
5. Since I was appliqueing onto a t-shirt for this demonstration, I used a fusible interfacing on the inside of the t-shirt underneath the applique. This helps to keep the fabric from distorting while sewing and also prevents the shirt from stretching too much in that area - a lot of stretch would put stress on the fabric and the stitches of the applique. If you are appliqueing onto a woven fabric, fusible interfacing will not be necessary.
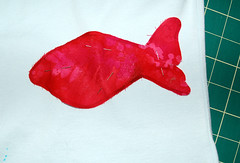
6. Pin your applique shape into place. You are ready to start sewing.
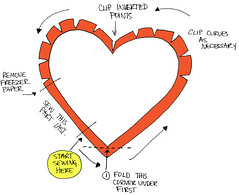
7. You'll be leaving an opening on one side of your applique where you can pull the freezer paper out before you finish sewing, so chooses a side that will be easy to sew without the freezer paper in place, and leave that side for last.
8. Then knot the end of your thread and take your first stitch. It's easiest to start by coming up through the back of the applique fabric alone, at the fold line. Then start stitching through the base fabric.
The easiest and most invisible stitch to use for applique is a ladder stitch. I've tried to illustrate this stitch with the next three photographs. Essentially, you'll go into one fabric directly across from where you came out of the other fabric. In this way, the thread will draw the two fabrics together invisibly. Keep your stitches slightly underneath the edge of the applique so they will show less.

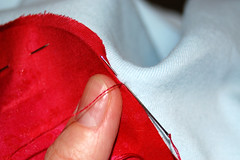
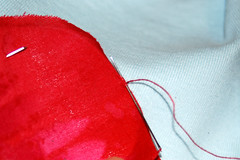
As you stitch, tuck the seam allowances underneath the applique and clip the seam allowances as needed. For corners, fold the tip of the corner underneath before folding the edges in. This will give you a sharper corner. Curves can be clipped if necessary, but be careful not to clip too closely or your fabric might start fraying at the edges of the applique. Experiment to find what works best for you. Inverted points will require clipping in order to fold the seam allowances underneath. Again, a little experimentation will help you feel comfortable with the method that works best for you. I try not to clip until I'm ready to sew that area to minimize the fraying problem.
9. When you've stitched nearly all the way around your applique and have a smallish opening left (1-3 inches, depending of the size of the applique itself), finger press the remaining seam allowance into place. Then use a tweezers or a blunt instrument (I often use a letter opener) to reach in through the gap and separate the freezer paper from the fabric. You can now pull the freezer paper out through the opening with a tweezers and finish stitching the applique into place.
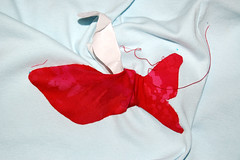
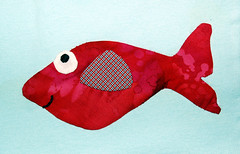
10. You're finished! Press your applique one more time to help the seam allowances relax into place and to remove any wrinkles from the fabric. Now you can add additional applique, embroidery, or paint on top of your applique to decorate it.

really great step by step! how nice of you to share this tutorial!!!
ReplyDeleteI use freezer paper all the time when I make patterns and I knew it could be used for applique, but I have never tried it myself. Thanks for the tutorial - I am inspired to try it now!
ReplyDeleteThis is an excellent post Liesl. I've often wanted to find a thorough explanation of applique, and here it is, look no further!
ReplyDeleteThank you!!!
ReplyDeleteWonderful tutorial. I've been using freezer paper to print on fabric, but never tried it for appliquing. Now I have no excuse not to try it out. Thank you!
ReplyDeleteWow! Thanks so much for sharing! Your pictures are very helpful!
ReplyDeleteAngela
I've had several classes on applique some with freezer paper. I like this on and will give it a try. Well written and illustrated, thanks. nancy
ReplyDeleteThanks a lot for this! I was looking for an easy-to-follow instruction for beginners and am so glad I came across this. Very helpful, and I like your fish :)
ReplyDeleteSince i didn't want to have to buttonhole stitch around all that ways, i have so far done only shadow applique. With your method, i may just try it.
ReplyDeleteThanks,
Lady Jem
found this off www.allaboutapplique.net, cool tutorial!
ReplyDeleteso far this has been the best tutorial I have found for appliquing. I can't wait to give it a try.
ReplyDeleteyou rock !
ReplyDeleteThank you so much! I've been wanting to try applique and your instructions are awesome!! Very easy to follow and you answered all of the questions I've had about it until now. So glad I found your page.
ReplyDelete