Wednesday, May 31, 2006

Martha, Martha, Martha

I love Martha Stewart Living magazine. It's one of my favorite magazines. I want to save every issue but can't because we don't have the space for it. So instead I've saved many, many articles and all of the Good Things columns in big binders to which I frequently refer. The trouble with MSL, however, is that I find so many great ideas and never have enough time to do them all. I still have articles from 1992 that I love and from which I find inspiration. Isn't that weird, that I still love those same articles and ideas after so much time?

linen6
Anyway, I spent naptime today tearing through my binders, trying to find the article in which lovely Martha dyed fabric with natural plant dyes (my friend Laurel says it's September 2001, but she doesn't have it either). I can't locate it although I'm sure I saved it. I remember loving the resulting colors, and I really want to dye some cotton voiles myself this summer, especially since white voile costs just a few dollars a yard but the colored voiles are all something in the range of $16, which is just outrageous when I'd rather create my own colors anyway. So here I am, drooling over the Baker's Linen Apron and feeling the need to order myself a bunch of that gorgeous linen, finding the sleekest and simplest shelf brackets, finally uncovering that article about making your own lamps from old vases and pottery. Grandma B. always quotes a dear, departed mutual friend of ours who used to say, "Every day Ben [her husband] and I look for something we've lost, and every day we find something we didn't know we were missing." I feel that way about Martha; every time I look through my MSL archives I find some other project I didn't know I needed to make. And meanwhile, I haven't found the project I already did know I needed to make.

linen3
linen2
linen1
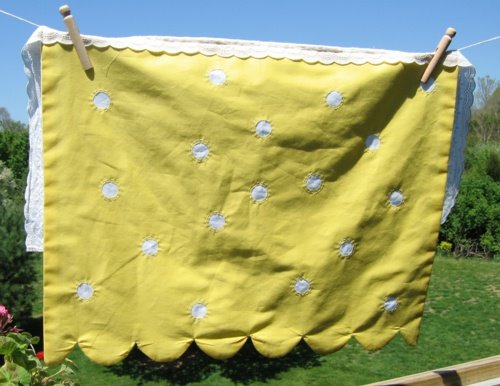
These are some of my favorite linens from Grandma V. Thanks for your sentiments and for your comments and suggestions regarding the stains. I've been soaking them in Oxi Clean and hoping for the best, and in some cases the results have been terrific. The one item that I love most, however, is proving to be more troublesome: this tablecloth is card table-sized, and the cross-stitched scene repeats on all four sides, while the little motif/letters (I wonder if this is a foreign language or just a geometric motif?) repeat at each corner. It's made of high quality linen, and the embroidery is all cross stitched. It must have taken forever to make, and I have no idea about it's origins: Grandma and her second husband may have picked it up during one of their many trips. She must have bleached it already, since the tablecloth is lighter than the matching napkins. It may give me an excuse to spend a morning in the sun sometime when the babysitter can watch the kiddo and I can pretend to be removing the spots from the tablecloth when I'm actually laying in the grass, reading a book, and simultaneously hoping that the stains come out with me doing nothing to help them. I'll need to re-stitch that bleached cross-stitched area as well.

linen5
By the way, there's been a lot of blog talk about the faded and overdyed fabrics in the most recent issue of MSL. Count me in: I immediately reached for the yards of garishly printed voile I bought a few months ago. The fabric was really inexpensive, unlike those Liberty Tana Lawns that Martha's people used. I need more bleach to do the job, but I'm thinking about a summer blouse, maybe a little bit like this one.

linen4

Monday, May 29, 2006

Back again

We're home again, albeit without any fun crafting and things to share (the photo below is one my sister Christy took). Not much crafting of any sort happened while we were away, and I didn't even have time to visit fabric or yarn stores. But not for lack of trying: I spent the week helping my mother and uncle empty out my grandmother's condo, since she's recently gone to a nursing home. Somehow I deluded myself into thinking we could do it in a few days, and then I would have time to visit other relatives (and a few shops as well) with my spare time. I should have known better.

goldfish bowls - Christy took this photo
Grandma is 90 (I think), and she grew up during the depression, when absolutely everything had value. Nothing was thrown out. I can't begin to express what that meant in her condo. Every closet packed with things that might be useful to someone, someday. My uncle and father made numerous trips to the garbage, the recycling, and the thrift shops; I found dozens of emery boards, multiple crochet hooks in the same sizes, drawers filled with spools of thread, boxes of old credit card bills, and stacks of old towels in the linen closet. You get the picture. If all felt a little like digging through piles of stuff at a thrift shop, except that I had to decide what to do with each thing, rather than just looking for the buried treasure.

And I did find a few little treasures: those aforementioned spools of thread (wooden, and some of the thread is silk), and lots of pretty linens which I hope will wash up nicely. Anyone have some tips for removing stains from tablecloths and napkins? They aren't white, so I can't simply bleach them. But the embroidery is lovely and I don't want to cut them up.

And more importantly, Grandma saved all the cards and letters we sent her, so now we each have a little record of our lives as we wrote to her. I can't think of a nicer way to remember my Grandma; I think it's better than receiving a keepsake heirloom. I only wish I had saved her letters to me in return.

Mom and I also started to sort Grandma's photos, which gave me a chance to learn more about my mother's family history. The more I learn about her childhood, the more I appreciate and understand my mother who, by the way, is an amazing woman. Yesterday the kiddo fell asleep in the car, so we spent a pleasant naptime driving through the neighborhood where she grew up. She talked about some of her experiences, and it fascinates me to learn about her life as a little girl.

Anyway, Grandma is nicely situated in her new room, with a select few pieces of furniture and favorite art on the walls. Sometimes she seems almost like herself again, and other times she just doesn't seem to be in the room at all (she sleeps most of the time now, and she's lost interest in almost everything). Bebe got to spend some time with all of her grandparents, and Todd's parents took care of her for three days while we worked. I'm glad we've finished; it's nice to be home again, and Grandma was grateful and relieved that we took care of the apartment without her.

I had to say goodbye yesterday; I don't know if I'll see Grandma again.

Now I need a good night's sleep, and the sewing machine has been calling to me. Maybe I'll write Grandma a letter tomorrow as well.

Sunday, May 21, 2006

A few random things

Truly random, with no connections whatsoever:

I'm not very good with Photoshop, and it's been a year or more since I last used it. I would probably use it more if I was faster at it, but lately I just don't seem to have much time to do the fiddling (hmm, I can't imagine why not!). It's a vicious circle, isn't it? Because if I worked with Photoshop and Illustrator more often, I'd almost certainly be quicker with them. Anyway, I just couldn't decide how the next dress should look, and it was fun to mock up several possible combinations. I still can't decide, however. Anyone feel strongly about one or the other?

floral dress 1
floral dress 2
floral dress 3
floral dress 4
Here's an interesting story from NPR's Morning Edition last week about sewing machines and the industry's attempts to renew interest in home sewing.

Also, J.Jill is holding a t-shirt design contest. Submit artwork of your favorite inspiration from nature, and the winning design will be printed on a limited-edition tee and sold as part of the Holiday 2006 J.Jill collection.


Just finished Snow Flower and the Secret Fan, by Lisa See, and I recommend it. It's a well written, historically-based novel about women in pre-revolutionary China and a secret written language that they developed.

DSC_0009It's too bad that Snow Flower went back to the library so quickly, because she would have looked nice next to my first Lorna's Laces sock, finished at last. I know I should have chosen a simpler pattern for this variegated yarn, but I'm still really pleased with the results. I like the fit, I loved knitting the lace, and I'm happy to have managed the magic loop technique as well as the short rows.

Sock number two will be going to Michigan with us next week. Bebe and I are leaving tomorrow morning to visit grandparents (hers and mine) for a week. We'll be back on Memorial Day. Have a great week!

Friday, May 19, 2006

Less talk, more vegetables

If there's one thing I really hate about sewing, it's hemming. Poor Todd knows this from experience: he's waited months, sometimes even a year, for me to hem his pants. I procrastinate as long as I can, even when it's a simple little task like mending part of a hem that's come out. If it weren't for the strong desire to finish a project, I'd probably never do any hems at all. But when you've put all the work into making a pattern and sewing the rest of the dress or skirt, you can't really let a little hem stop you from finishing, can you?

DSC_0055
DSC_0064This little dress was a brainstorm I had last weekend. I whipped out the pattern, spent a few naptimes sewing it, and then the dress hung in the dining room all week, waiting to be hemmed. So I finally finished it last night and couldn't wait for the weather to turn nice for a photo shoot. The model's mood was a wee bit grey as well; we managed a trip to the library this afternoon, but apparently someone needed a longer nap.

Anyway, I'm happy with the dress but, as always, the pattern needs some tweaking. I was sure that the buttons would sit further in front of her shoulder rather than on top, so the straps need to be adjusted forward about an inch. And I think the curve of the waistline is a bit too extreme. You can't tell from the photos, but there are princess seams on the skirt so that it flares all the way around rather than just at the side seams. I'll be making this pattern again, once the adjustments are made. I think I'll add piping at the princess seams next time, just for the fun of it.

DSC_0007

By the way, I don't think I spend very much time on the phone, but I'm getting a few hints that I may be wrong on that count. First of all, I had to get a new cell phone plan because I kept burning through the four hours (!) of time on my old plan. And now a certain someone walks around the apartment with a cell phone glued to her ear with one hand. Perhaps I should start eating jars of Earth's Best Summer Vegetable Dinner baby food, since I'm obviously being imitated very closely.


whipup

Wednesday, May 17, 2006

New York crafters' resources

See the updated version here.

So you're coming to New York and want to check out the crafty shops. This is a short list of my favorite places. It's not a complete list of all available shops in New York City, but if you have other favorites to add to the list, please leave a comment.

Fabric Shops
B&J
525 Seventh Avenue,
between 37th and 38th Streets, 2nd floor
212.354.8150,
http://www.bandjfabrics.com/
Open Monday through Saturday
By far the best resource ever. Be sure to check out the inspiration walls, where the staff has collected tearsheets from fashion magazines and attached similar fabric swatches. B&J carries everything from luxury fabrics (unbelievable silks and embroidered, beaded fabrics) to basic cotton canvas (in a plethora of colors). Also a fantastic selection of Liberty of London voiles.

Rosen and Chadick
561 Seventh Avenue, 2nd floor
212.869.0142
www.rosenandchadickfabrics.com
Open Monday through Saturday
Great selection, great prices, helpful and friendly staff. This is usually my first stop in the garment district.

Gray Line Linen
260 West 39th Street
212.391.4130
www.graylinelinen.com
Open Monday through Saturday
All linen, all well-priced and beautiful.

Ribbons and Trim
So-Good
28 West 38th Street
212.398.0236
http://www.so-goodinc.com
The most inexpensive and maybe the dustiest.

Tinsel Trading
47 West 38th Street
212.730.1030
http://www.tinseltrading.com/
A treasure trove of trims, both new and vintage. Lots of other fun things as well. Give yourself lots of time to browse, and be sure to ask questions since the history of the shop is fascinating. This is a wonderful place to spend an afternoon.

Hyman Hendler
67 West 38th Street
212.840.8393
http://www.hymanhendler.com/
Dusty, musty, and messy. But gorgeous ribbons. It's worth digging through the bins, although you may be surprised at how expensive a yarn of ribbon can be.

M&J Trimmings
1008 6th Avenue (between 37th and 38th)
212.391.9072
http://www.mjtrim.com/
Open Monday to Saturday
You've got to see this place. Now with multiple rooms carrying buttons, beads, ribbons, bag handles, you name it. You won't believe your eyes.

Tender Buttons
143 East 62nd Street
212.758.7004
Open Monday to Saturday
Like stepping back in time someplace in Paris, this tiny shop stocks beautiful vintage and antique buttons. It helps to have a particular project you're shopping for, or you may get your wallet into trouble here.

Notions
Steinlauf & Stoller
239 West 39th Street
212.869.0321
http://www.steinlaufandstoller.com/,
Open Monday to Friday, 8-5:30
I wrote about this place last week.

Pacific Trimming
218 West 38th Street
212.279.9310
http://pacifictrimming.com/
The displays aren't as appealing, but the prices are much better than the competition. Selection varies, and don't let the disorganized chaos of the place turn you off.

Quilt Shops
Purl Patchwork
147 Sullivan Street (between Houston and Prince Streets)
212.420.8798
www.purlsoho.com/purl/purlpatchwork
Monday to Friday 12-7, Saturday & Sunday 12-6
My favorite quilt shop.

The City Quilter
133 West 25th (between 6th and 7th Avenues)
212-807-0390,
http://www.cityquilter.com/
Open Tuesday through Sunday (yeah, don't go on Monday like I always seem to do)

Knitting


Purl
137 Sullivan Street
212.420.8796
purlsoho.com
Monday through Friday 12-7, Saturday and Sunday 12-6
My favorite yarn store. Close your eyes and pick a yarn; whichever it is, I'll bet it's gorgeous!

Downtown Yarns
45 Avenue A
212.995.5991
downtownyarns.com
Cozy, nice selection, great window displays, and really helpful employees. And that screen door just feels so welcoming, like returning home after a long day.

Japanese Craft Books
Kinokuniya
1073 Avenue of the Americas (near 40th Street, across from Bryant Park)
212.765.7766
kinokuniya.com/ny/
Their brand new location, which I haven't had time to visit yet! At the Rockefeller Center location all the books were in Japanese. So what? The photos and styling of Japanese craft books are terrific, and the directions are usually clear enough to follow even if you can't read what they say. I could personally spend hours browsing the craft books, so watch out!

Inspiration

Anthropologie Rockefeller Center
50 Rockefeller Center
New York, NY 10020
212.246.0386
Anthropologie.com
Any Anthropologie store will do, but especially the flagship is a fantasy of beautiful displays and inspiring ideas. Have someone you love hold your wallet while you browse, and tell them not to let you have it until after you leave, no matter how much you plead. Really.

ABC Carpets
888 & 881 Broadway New York, NY 10003
212.473.3000
abchome.com
Wander the floors of the home store and you'll find all sorts of treasures. Be sure to check out the children's mezzanine if you have kids.

Takashimaya
693 5th Ave
New York, NY 10022
212.350.0100
www.ny-takashimaya.com
Be sure to browse the floral shop at the front of the first floor. This entire store is curated to feature beautiful and unusual items.

Outside Manhattan

Brooklyn General
128 Union Street
718.237.7753
www.brooklyngeneral.com
Yarn, fabric, books, wool felt, milk paint, vintage buttons, and kids. Only the kids aren't for sale. A nice selection of vintage fabrics as well.

Monday, May 15, 2006

Genes, jean skirt, skirts

The trouble with blogging is that sometimes life gets in the way and I can't find the time to blog. When that happens, a blogging backlog develops, and then you get posts like today's post. I'll start with genes and then go to skirts.

My sisters' ages are symmetrically arranged, by sheer coincidence. Sharri is two years younger than I; then Alayna is five years younger than Sharri, Adrienne is five years younger than Alayna, and Christy is two years younger than Adrienne. And unlike Todd, who can remember when his sister was teething (he would have been three at the time), I remember nothing about when Sharri was really little. So it's no great surprise that I don't remember Sharri's lunchbox.


According to Mom, Sharri had a Very Important Lunchbox. She took that lunchbox with her everywhere she went and was completely obsessed with it. Everything of any importance went into the lunchbox for safekeeping, and if the car keys were missing, Mom had to wait until Sharri was sleeping before she could look in the lunchbox to find them: you didn't mess with the lunchbox while Sharri was awake.

When Alayna was small, Sharri and I thought the lunchbox story was hilarious, and we encouraged Alayna to carry her own box around. Alayna wanted nothing to do with our plans, but there we were, following Alayna around with a lunchbox, trying to cajole her into carrying it.

Maybe the gene was passed along; recently Little has developed a fascination with shopping bags. She enjoys carrying her sketchbook and pencil, the old remote from the stereo, and whatever else she can find to put into her shopping bag. She insists on walking and dragging the bag along when we go out, which of course takes forever, but how can I say no when she's clearly so proud of herself?

So of course I had to dig out my old lunchbox today. At first she was quite intrigued with it and carried it around on a test run or two, but her little fingers aren't quite adept or strong enough to manage the latch, so back to the shopping bag she went.

Maybe in a year or two she can carry on her aunt's legacy. I'll try not to push it any more than I have already.

By the way, that little denim skirt the kiddo is wearing in the photos is one I made so she'll have something to wear with the fun tights Sharri gave her. I've been meaning to sew it for months now but only just found a nice lightweight denim I liked. Fortunately the weather is cool enough that she can still wear it before summer starts.

And speaking of skirts, Christy's skirt (from the waistband tutorial) is finished. I think it turned out well; I just hope it fits her and she likes it. I probably won't be giving a tutorial on this one; the instruction would frighten away everyone who's still left after the terror of the scalloped hem.
skirt
skirt
skirt
Pattern: my own
Fabric: this one

No more skirts from me for a while. But speaking of scalloped hems, I'm thrilled to show you someone else's skirt! Betsy followed the tutorial and made this adorable skirt for (correct me if I'm wrong, Betsy, my memory is terrible) her daughter to wear while playing golf. I love her fabric choices and that fabulous pocket with the curved hem. Thank you for sending the photos, Betsy!

skirt2

Thursday, May 11, 2006

Practical joke

The kiddo and I found this bolt outside our building today. The keys are in the photo just to show you how big it is.

So what do you think would happen if I told the maintenance man that it fell off our toilet? How long should I let him stand there scratching his head before telling him the truth?

No, I won't do it. But it might be really funny.

Wednesday, May 10, 2006

Despairing? Distressed (or disdressed)?

Oh dear. When I look at that last post, part three of the tutorial, I worry that I may have frightened you all. Sorry. I swear the scalloped hem is not difficult, although it may appear to be terrifying with all those steps I listed. If it seems too intimidating, you might want to try making scallops on something else using the same technique, just for practice. Maybe an apron or smock? The theme for Tie One On in May is a smock, and I'm really excited about it because I've been tossing around some smock ideas for a while now. When we were living in Barcelona last September I saw lots of great smocks being worn by shopkeepers, and I've been contemplating what an attractive, useful smock for me might look like. I just hope I can find enough time to make one this month.

This apron is from Craftlog. I think it's so beautiful!


Also came across this great photo of Christopher Milne (aka Christopher Robin) wearing a traditional child's smock. Probably not a great silhouette for an adult, but it would be a cute girl's smock. Especially with a scalloped hem.


I mentioned a while ago that I'd like to start a website or blog for the travelling crafter: a sort of where-to-go-when-you're-in-x site. I'm still working on the idea, so stay tuned. In the meantime, I'm in the process of compiling a short list for those of you headed to NYC: knitters, sewers, quilters, and embroiderers alike. I hope to post it in the next day or two.

Monday, May 08, 2006

Scalloped hem skirt tutorial #3: the scalloped hem

Before we start this part of the tutorial, I want to point out a terrific article in Threads magazine (online) that I found over the weekend. It's an excellent guide to making scallops.

And then let me also give you the usual reminders:

1. Click on any photo/drawing for a larger view.
2. Notes on the photos will pop up if you hold your cursor over the photo.
3. If anything is confusing, please leave a comment or send me an email and I will do my best to clarify.
4. See the previous posts: The Skirt, Getting Started (part 1), and the "Un-"Waistband (part 2).

So here we go:

1. Put on the skirt and have someone help you mark the hem. Note that the hem on an A-line skirt is slightly curved, not straight as it would be on a pencil skirt. The best way to mark a hem like this is to measure from the ground up, all the way around the skirt. Wear a pair of shoes that you will wear with the skirt so that your posture is the same as it will be when you wear the skirt, since the height of a heel can throw your weight differently.

2. Take off the skirt and draw the curve of the hem directly onto the fabric using chalk or some other temporary marker. Fold your skirt in half and mark the center back as well. Check the hem you have marked and correct any wavy lines. Then remove the basting stitches from the side seams so that you can work with the back hem separately from the front hem.


3. Use a ruler or a strip of paper to find the width of the back hem from side seam to side seam. Then fold or divide this measure by an even number: I divided mine by six. This will be the approximate width of each scallop.


4. Find or draw an arc shape to use as your scallop edge. You might use a glass, a bowl, or you could use a compass to draw an arc. You don't have to use a full semi-circle; you could use just a portion of the circle for a more shallow arc shape. Once you have an arc shape you like (and which is the correct width for your measurement in step 3, above, trace it onto cardstock and mark the top corners of the scallop carefully. Mark the center of the scallop as well. Cut out the shape of your scallop: this will be your template.


5. Measure the height of your scallop, from the bottom of the curve to the corner. On your skirt, draw a line this high above your original hem line. This will be the line that you use to align your scallops.


6. Fuse a piece of interlining to the inside hem of your skirt, covering the two hem lines you have drawn and extending slightly above (at least 1") and below the two hem lines.


7. Now you'll need to transfer your two hem lines onto the interlining side of the skirt fabric, where you'll also be drawing your scallops. To do this, you could poke a pin through the hem lines at regular spots, and then rub your chalk over those places where the pin comes through on the inside of the skirt/interlining. Redraw the hem lines at the inside of the skirt, and then you can start drawing your scallops onto the interlining. Start lightly, since you will probably need to do some adjusting. Use the top hem line you have drawn to align the top of each scallop along the curve of the hem. Use the center line you drew on your template to mark the scallops at the side seams, which should each be half of your scallop shape, and the scallop at the center of the skirt should align with the center line on your scallop template. Note that the lower edge of the scallop curve should align with the placement of the front hem when you reach the side seam. Adjust if necessary.


8. When you are happy with your scallop shapes, cut a length of fabric to use as your facing. You can use the same fabric that you used for your skirt, or you could use a contrast fabric if you want a little color on the inside of your scallops - just for fun. I used a piece of natural-colored lightweight muslin for my skirt. Cut your facing along the length of the fabric so that the selvage edge will become the top of the facing. This saves you from a bulky seam that might show through on the outside of the skirt.

9. Pin or baste your facing fabric to the outside of the scallop hem, aligning the selvage edge an inch or two above the top of the highest scallops (the scallops nearest the side seams). I found it worked best to baste the fabric at the top and bottom so that it did not slip as I was sewing.

10. Sew your scallops, following the lines you've drawn.


11. Press the scallops flat to set the stitches. Then trim around each scallop, leaving a scant quarter-inch seam allowance. Snip into the corners between the scallops very carefully; you want to clip as close to the stitching as possible without clipping your seam.

12. Un-pin or remove the basting from the facing and turn the scallops right side out. Open and press each curve individually, making sure that the seam is opened and the curves are smooth.

13. Once you're happy with the scallops, smooth the facing and skirt hem and baste the facing to the skirt at the side seams. Then you can sew the side seams of the skirt, catching the facing in the seams.

skirt back folded in half (inside out)
scallop close up at side seam
14. Blindstitch the selvage edge of the facing to the inside of the skirt fabric. Catch a few threads of the skirt in each stitch so the facing doesn't hang down or flap around when you are wearing the skirt.

15. Hem the front of the skirt along hemline you drew.

And you're done, at last!

skirt1
I would love, love, love to see completed garments. Please send me photos, and I will be happy to post them if you will permit me to do so.

Friday, May 05, 2006

If you can find it there...

I can't begin to tell you what a pleasure it is to look at my blog at the end of a tough day and find comments from you regarding a post. Your thoughts make me stop and think, sometimes laugh aloud, and frequently do a little further investigating based on the links and ideas you offer. I often read your posts aloud to Todd; it's just so fun to hear/see what you have to say! Thank you very much. Your feedback makes the time and effort of blogging very worthwhile to me, and I really appreciate hearing from you.

Today I had to be up in the garment district to pick up some odds and ends. Few things are more difficult to find in New York than sewing notions. (Ok, maybe I exaggerate. There are a handful of items more difficult to find: friendly grocery cashiers and convenient public bathrooms come to mind. But back to my point.) In the rest of the country, when you go to the fabric store you can buy fabric, sewing patterns and notions all in the same place. Not here. Here fabric stores carry fabric. Rarely patterns, no zippers, no thread.

a package of needles, wrapped like a stick of gum
Way back in the old days, when we first moved here, Woolworth's was still in business. They didn't have a fantastic selection, but you could find thread, zippers, buttons, and a few additional sewing accountrements there. When they closed I was lost. It took a little research to find my way to Steinlauf and Stoller.

Steinlauf and Stoller
Steinlauf and Stoller is one of very few notions suppliers in the Manhattan area. They provide much of the garment industry, especially design houses with sample rooms (a rare luxury in this day of overseas development and production), with notions and supplies. Walking into S&S feels a lot like moving back in time. This is not glamorous shopping; the walls are lined with dusty metal shelves which are filled with small cardboard boxes holding the necessities. Zippers are kept in boxes sorted by color and size; rummage around in a box labeled "Eight inch invisible zippers: Blue" until you find a navy zipper similar to the color you are trying to match. Rolls of pattern paper can be found poking out of a cubbyhole toward the back of the shop. If you wait your turn, one of the men (and occasionally a woman) behind the counter will assist you with bra hooks, boning (used for fitted garments, especially strapless gowns), snaps, shoulder pads (yes, indeedy!) and other bits. And at the very front of the store you'll find a woman working an industrial machine that sets grommets and snaps on clothing, especially on denim and leather.

If you stay and watch for a while, you'll see employees from some of the fashion houses drop by for sample room supplies. Someone might bring in a jacket that needs snaps before a photo shoot or a fashion show. Another person may stop to pick up a large boxes of pins or to have their scissors sharpened. Students also purchase their supplies at S&S, and occasionally you'll find someone who sews for fun.

I sometimes wonder how much longer little shops like this can survive in New York. S&S clearly does a lot of business, but the crazy, dilapidated old cavernous trim shop on Broadway in SoHo closed a few years ago (Oh, what stories I can tell about that place! Once I requested hem tape, and the 98-year-old man behind the counter rummaged around in a box behind him, handed me a knot of multicolored bits that had been sewn together, and said "Here you are" as though he was offering me a brand new package of the stuff. Huh? In order to use it I had to separate the red from the green tape with a seam ripper. That's old-fashioned New York customer service for you.), and outrageous real estate prices combined with a trend toward more upscale retail shopping (including a little bit of attention given to retail display: whoa!) will continue to make business more and more difficult for the old stalwarts of the business. Would I miss S&S if they went out of business? Sure. There aren't many other options for sewing notions in this city, and the character of the place adds interest to my shopping experience. I like shopping locally and supporting small businesses. I'd just as soon not shop at a big chain like Joanne Fabric for my notions. On the other hand, I'd love to have something closer to our neighborhood, or something with a little more attention given to new products in the market. You won't find a rotary cutter at S&S, that's for sure.

But where else could I have my giant sewing scissors sharpened? And what would be missing from my life if I didn't receive a hand-written receipt for my purchases? As idiosyncratic as Steinlauf and Stoller may be, I'd hate to lose that connection to the old New York. Especially since I can't buy used hem tape on lower Broadway anymore.

Thursday, May 04, 2006

Fact or fiction?

My sister and I were sorting through a box of clothing from our childhood the other day, reminiscing about dresses we had worn while deciding which of our daughters would be wearing which hand-me-downs. (Bebe and her cousin are only four months apart and wear the same size.) Part of our reminiscing involved stories about the hand-me-downs we received from our second cousin, Mary Ellen, when we were growing up.

smockMary Ellen's clothing was always immaculate. It consisted of tailored wool coats and delicate, frilly dresses. Never blue jeans. Never parkas or playclothes with any sign of wear. And along with that impeccable clothing, which arrived via our grandmother (who always wanted to be called "Gram", but that never felt natural to me - she remains "Grandma" despite her best efforts), came tales of Mary Ellen and her model behavior. Mary Ellen practiced piano every day. Mary Ellen set the table before dinner and helped with dishes afterwards. Mary Ellen did exactly as she was told, never complained, and certainly never talked back.

Even when we reached high school we heard how Mary Ellen was such an obedient young lady who returned directly home after basketball games and didn't go to after-game dances with boys. Mary Ellen was obviously perfect and quite nauseating. To us, anyway.

As we were discussing her, it suddenly crossed my mind that we have never met our second cousin. And I asked my sister, what if Mary Ellen never really existed? Maybe she was an imaginary character, created by Grandma purely to mold (or pressure) us into better behavior? Perhaps Grandma got all that clothing from someone or someplace else, made up stories to accompany the Sunday coats and dresses, and passed them along to us in the hope of encouraging her willful, messy, non-piano-practicing granddaughters to clean up our acts, listen to our mother, and start behaving as young ladies should?

smockIf that was the case, Grandma hasn't given up. Apparently Mary Ellen is living near the ancestral farm in Michigan with her husband and two children. I'm sure her coats and dresses are immaculate. And her children are, too.

So perhaps I should wash the dishes before going to bed tonight, after all. I mean, I'm sure that's what Mary Ellen would do.

(The smocks in the photos belonged to one of my sisters. I think that my other Grandma made them. They're hand smocked and beautifully made, inside and out. I'm afraid to put them on Bebe, for fear that she'll stain or damage them. I think that instead I'll hang them someplace where I can enjoy looking at them, and meanwhile I'll let the kiddo be herself and wear clothes she can actually play in without either of us worrying.)

Wednesday, May 03, 2006

Scalloped hem skirt tutorial #2: the "un-"waistband

Here, at last, are the instructions for making a skirt without a waistband. A couple of tips:

1. Click on any photo for a larger view.
2. Notes on the photos will pop up if you hold your cursor over the photo.
3. If anything is confusing, please leave a comment or send me an email and I will do my best to clarify.

Ready?

Ok, so you've got your skirt cut out, the top of the skirt staystitched, and you've checked the fit and trimmed your seam allowances as needed (see Tutorial #1: getting started). Now you can make the facing for the "un-"waistband.

tracing the top of the skirt for the facing
1. The facing will be identical to the top 3 1/2" of your skirt with the seam allowances. Pin the top of your skirt to another piece of fabric that is as wide as the skirt top and about 5" or 6" high. Cut out the fabric at the top and sides. Then unpin the skirt from the fabric and use a ruler to measure, mark, and cut the bottom of the facing 3 1/2" from the sewing line at the waist.

facing: cut the bottom of the facing 3 1/2 inches from the waist sewing line
Make one facing for the front and one for the back.

interlining the facing - trim seam allowances to reduce bulk at seams
2. Then use a warm iron to gently fuse interfacing to the wrong side of the facing. Just touch the tip of the iron to the interfacing in a few places; you don't want to completely fuse the interfacing to the fabric yet.

3. Let the fabric cool, and cut out the interfacing to be the same size as the facing. Then, before completely fusing the interfacing to the facing, trim the seam allowances of just the interlining. This way you won't have extra bulk at your seams. (You can see in my photo that I did this all in one step. Sorry - sometimes I cheat. If you can see through your interlining, you can do it this way too.)

facing - back side: note statstitching at waist, finished bottom edge, and side edge folded and pressed
facing - front side
4. Now you can fuse your interlining to the facing. Then staystitch the waist of the facing, sew the side seam of the two facing pieces together (remember: the right side of the facing fabric will be facing the inside of the skirt, so be sure to sew the opposite seam than the side seam of the skirt where the zipper goes.), and turn under and press the seam allowance of the open side seam. Then finish the bottom edge of the facing. I usually cut some bias strips of a lining fabric like China silk or Bemberg lining and make a French binding, although on this example I was in a hurry and used a piece of pre-cut, pre-folded packaged bias strip that was handy. (I didn't even change my thread color to match the binding! Don't be lazy like me.) (This is an interesting way to finish your facing as well, although I've never tried it.)

finished facing - ready to sew into skirt: note side seam sewn and seam allowances at opposite side folded and pressed under
5. Now you can insert the zipper at the side seam of the skirt. If you've never sewn an invisible zipper or need a refresher, here are some very good instructions. I've found that using the proper invisible zipper foot on your sewing machine makes all the difference, and if you still have trouble or are unsure of yourself, BASTE first. (That's my motto most of the time: when in doubt, baste.) When you sew the zipper, be sure to align the top of the teeth just below the sewing line at the waist. When the zipper is closed, the top of it should end at the waist seam. If you don't have an invisible zipper foot for your machine, you could also hand sew the zipper.

6. After you've inserted the zipper, sew the side seams of the skirt until you're about 12" from the hem. Don't sew all the way down the side seams: baste the bottom part of the seams, because you will need to rip this part in order to sew the scalloped hem.

pinned in place
7. Now it's time to finish the waist and facing. With your skirt inside out, pin the facing inside the waist, right sides facing each other. Match the side seams, and note that the folded ends of the facing should line up with the zipper edge of the skirt, covering most of the zipper tape.

stitching the waist seam

press seam allowance and facing together away from skirt to prepare for edgestitching
8. Sew your waist seam, and then press the seam allowances and the facing away from the skirt.

edgestitch facing and seam allowances at waist seam
9. Edgestitch the waist seam on the facing side, catching the seam allowances in your stitching. By sewing the seam allowances to the facing like this, you'll force the body fabric to curve over the edge of the skirt at the waist, and the facing won't show when you're wearing the skirt.

facing - completed
10. You're nearly done with the waist! Turn the skirt right side out and fold the facing back into the skirt. Press the facing into place, and then slipstitch or blindstitch the edge of the facing to the zipper tape. It's also a good idea to tack the facing to the opposite side seam, just to keep it in place.

And that's it - you're done!

On a side note: You may have noticed that my photos do not show a classic a-line skirt like the Scalloped Hem Skirt. You'll see some extra seams in the photos because I'm making my sister a pleated skirt. (I'll post a photo or two once the skirt is hemmed.) But the method is completely the same, so don't get confused by those seams: you can make this facing for any skirt. Just be aware that if the skirt has darts or other seams, you need to sew those seams and darts closed in order to get the correct shape of the skirt before you trace the top of it for the facing. Let me know if you want another tutorial on this. It's quite simple, once you see how it's done.

Next: how to make the scalloped hem. I'll be back in a few days with the instructions.