Sunday, April 30, 2006

Progress report

You haven't seen it lately, but I have been knitting furiously behind the scenes. Sometime there has been more Furious involved than there has been Knitting. There have been several occasions in which Furious did not involve Knitting at all, but instead Ripping. I am pleased to tell you, however that Furious never resorted to tossing Knitting across the room with disgust, although it's come close a few times.

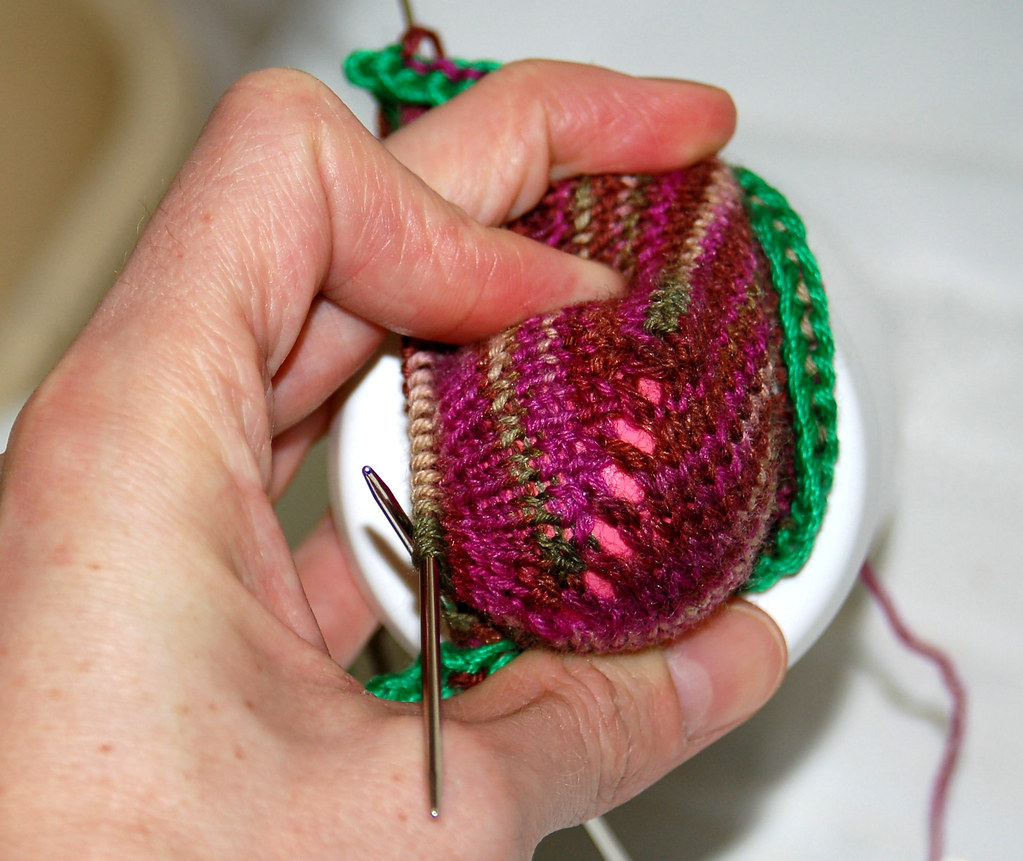
At last, I am starting to see some progress on my socks. After many, many false starts (Todd made the mistake of asking me how much time I have spent on these babies. If I were being paid by the hour, these may very well be the most expensive socks on earth.), I am finally catching on.


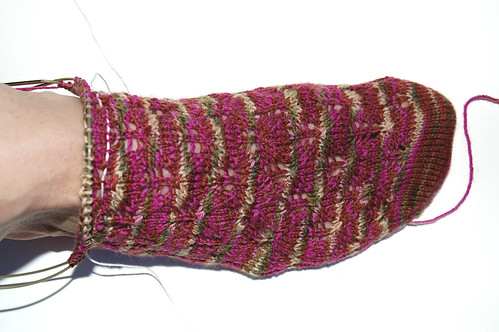
I think perhaps I took on too many new skills for this project: short rows (not entirely new, but those big holes on the side were new, that's for sure), magic loop, lace, and toe-up knitting. Plus, it's only my second pair of socks. Then again, that's the way I tend to do things: just dive in. If you know me well, it won't come as any surprise to you that I took on so many new challenges simultaneously. (But my mother may be surprised that the tossing part didn't occur when Furious was involved with the project.) I've learned quite a bit, despite the involvement of Ripping. I've also "discovered" a few helpful hints which I'm sure aren't news to more accomplished, experienced knitters, but which are proving to be very useful to me as I struggle forward:

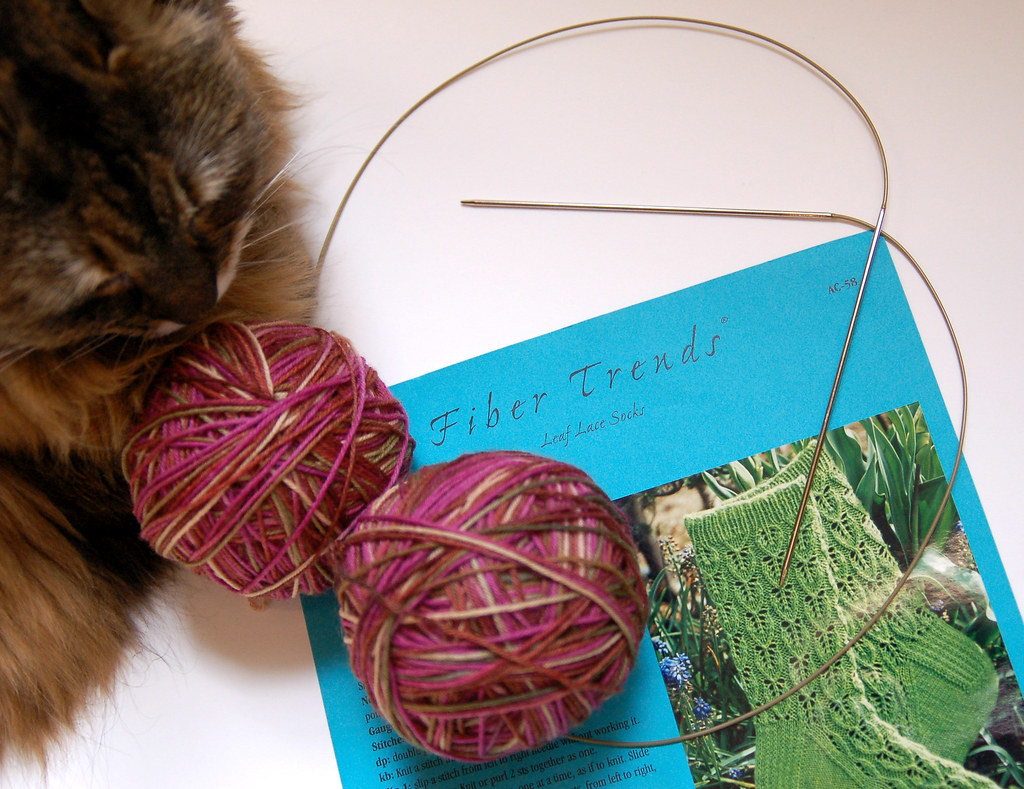
1. I can't remember who posted this idea, but I'm using a "lifeline" for the lace. At the end of each full repeat I pull a string through the loops on my needle so that if I need to back up I'll have all the stitches aligned and can start over at the beginning of that repeat without spending painful hours tinking and trying to find my way to the beginning of a row with all the stitches in place. It's come in very handy and will probably be really important now that I'm nearly to the heel and need to try the short row thing again (Furious grits teeth with determination in the background).


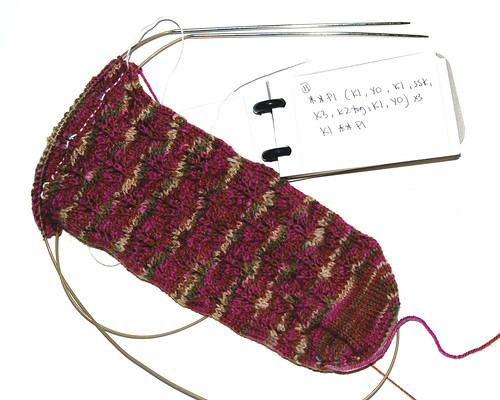
2. I've written each row of the lace pattern on a separate card in a flip notebook. This way I know exactly where I am in the pattern, even if I need to put my knitting down suddenly. It also saves me from misreading a line on pattern.

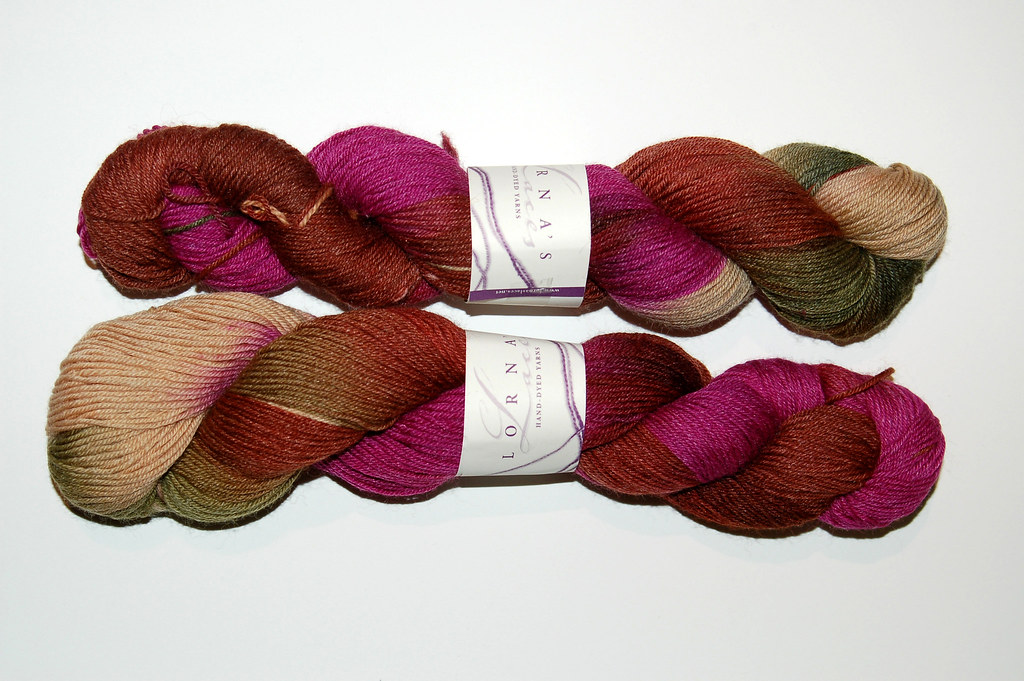
And yes, this Lorna's Laces yarn is fantastically addictive. Thanks, Emily! With all those colors to choose from, why would anyone ever want to knit with anything else? I'm not even minding the kajillion-stitches-per-inch thing; sometimes I forget that these are size 0 needles.

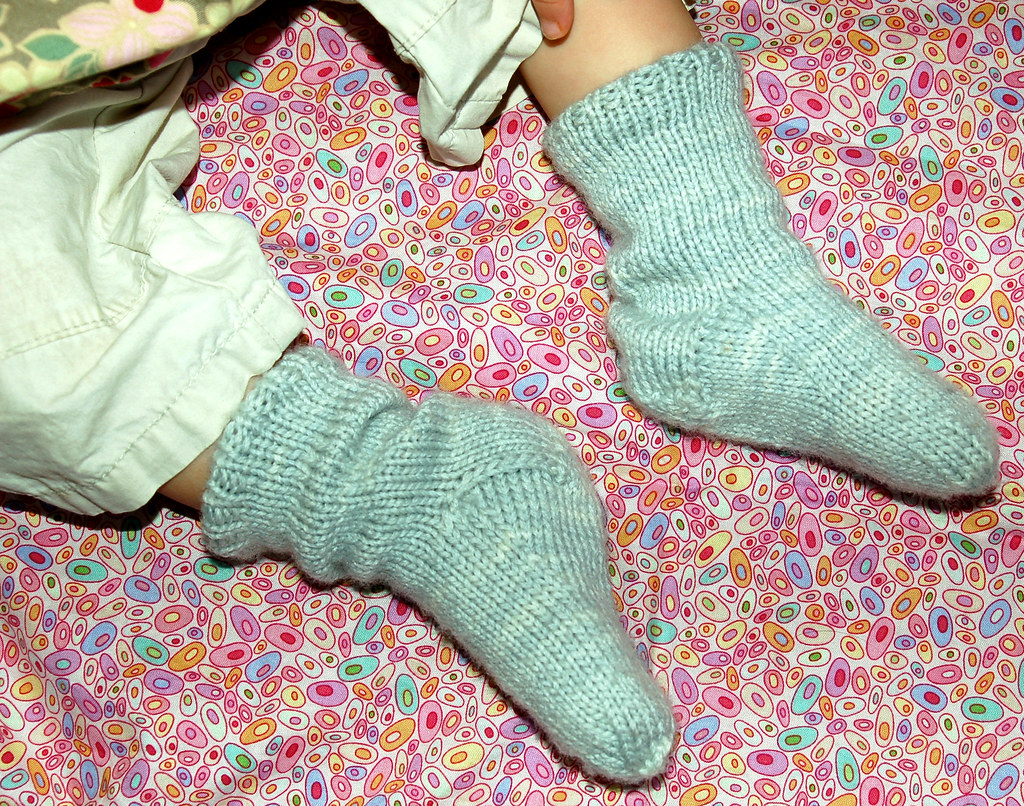
Did I mention that I've changed my mind once again and am back to making the Elfine sock after all? I finally came to that decision after ripping the toe at least four times. Anna's toe was simply a matter of "make one"-type increases. I like the result and the ease of this method much better than the short row method. So yes, the sock is taking forever. But who cares, when the yarn is this fabulous?

Wednesday, April 26, 2006

Scalloped hem skirt tutorial #1: getting started

Update: Typo alert! The Butterick pattern should be B4348. Sorry!

photo from Bees and Blue Fences
Ok, so here's the thing: you're keeping me up nights. No, no, I'm not worried about that; that's what your parents are for. Let them worry about the big stuff; I'm worried about showing you how to sew a skirt without making you go find and purchase a lot of patternmaking tools: pattern paper, hip curve, rulers, etc. So instead, I've selected a few basic A-line skirt patterns that you might start with. You could make the scalloped hem skirt with an A-line skirt or with a straight (pencil) skirt, but generally the A-line is a more flattering cut, and it's easier to make because it doesn't have darts. Here are a few patterns you could start with:

Burda 8089
Burda 8276
Simplicity 5005
McCalls M4258 (don't cut on bias if you use this one, even though the pattern calls for bias)
Butterick B4348

I'm sure there are many other patterns you could start with, so choose a simple one that you like and I'll show you how to alter it.

Next: fabric. You have a choice: you could either select a heavier-weight fabric like the Japanese fabrics at Purl Patchwork (a few are also available on-line at Reprodepot - see the Etsuko fabrics. I think the Amy Butler home decorating fabrics would also work well.) or you could use a lighter weight fabric and back it with muslin to create a heavier-bodied fabric to work with. This second option sounds more frightening than it actually is; you just treat the printed fabric and the muslin as one fabric, and it's surprisingly easy to sew.

Other items you'll need include a 7" invisible zipper, lightweight fusible interfacing, matching thread, an iron, and basic sewing materials (sewing machine, scissors, etc.)

If this is your first time purchasing a sewing pattern, be sure to compare your measurements to the measurements on the pattern, since garment sizing and pattern sizing aren't the same.

Cut out your pattern. If you haven't used the pattern before, I would suggest adding extra seam allowance at the side seams (one inch would be enough) so you can adjust the fit if necessary.

Once you've cut out the fabric, staystitch the waist so it doesn't stretch out of shape and then baste your side seams together so you can check the fit. I usually do this even if I've made a pattern before, since fabrics drape differently. Some fabrics may give a little more, in which case I adjust the side seams until I'm happy with the fit. Then trim your side seams down to the right amount and remove the basting stitches.

Now you're ready to start the skirt. I'll be back in a few days with the "un-"waistband. We're headed to New Jersey for a while to hang out with my sister and her children.

Photo from Bees and Blue Fences

Monday, April 24, 2006

On a semi skirt-related note

It's official. There will be two skirt tutorials: one for the "un-"waistband and one for the scalloped hem. Thanks for the feedback, and I'll get to work on it right away.

For those of you in or headed to New York, here are a couple of must-sees:

Christie's has been commissioned to auction a group of works for the Donald Judd foundation. Four reasons to see the preview:
1. The work is in amazing condition and has never been on the market before.
2. I would imagine most of the work will be sold into private collections, so you may not be able to see these pieces again later.
3. The space where this work is being exhibited is a perfect setting. Christie's has taken one and one half floors on an office building on Sixth Avenue (excuse me, Avenue of the Americas). Upon exiting the elevator, the whitewashed brick walls and warehouse-y feel of the space are a complete surprise.
4. The views of midtown from the exhibition space are rather surprising.

If you're in the area, be sure to stop by. See the link for details.


Waist Down, at Prada in SoHo is worth the trip for both the skirts on view and for the way those skirts are shown. This is a wonderful show of beautifully designed pieces, excellent descriptions of each item, and a cleverly-designed exhibit. The skirts were designed by Miuccia Prada. The show was designed by Rem Koolhaas. I'm sure the store (or Epicenter, as the people at Prada call it) will be busy for the duration of the exhibit, so go during the week if you're able.

By the way, I've been tossing around an idea to create a website for travelling crafters. When planning a trip, you could visit the site to find favorite yarn shops, fabric stores, and other resources as contributed by local residents and crafters who know the area. Todd suggested setting up a Squidoo page. Does anyone know of any other resources that might be useful in setting up a website like this?

Friday, April 21, 2006

Barter baby pants

Every two years, the Whitney Museum of American Art installs an enormous exhibit showcasing some of the new, important artists of the day. Carolina Caycedo is one of the artists featured in the current Biennial. Her work is conceptual: she barters goods and services she can offer in exchange for things she needs.

This sounded like a fun way to participate in the Biennial, so one Saturday, Todd and I went out for breakfast together sans Bebe, and Carolina and her daughter came to play with the kiddo. In exchange, I opened my fabric stash and Carolina selected a print, which I made into pants for her baby.

We had a great time at breakfast, and Carolina liked the pants I made. But the best part of the exchange was that our daughters got to play together twice: once while Carolina was sitting for us and once to pick up the completed pants. I forgot to take a photo of the pants (and the baby), but here is another pair I just finished making for Bebe.

summer
These are two of the pieces from Bebe's summer wardrobe. I'm not entirely satisfied with them, but I'll tweak the patterns a little more and make them again in a different fabric. Speaking of which, I'm really not happy with my fabric choices. This is what happens when you act of impulse and select fabric for a project long before you need it: by the time you actually start the project, you detest your selections. Initially I wanted to mix lots of bright prints together in a sort of Oilily style. But it was difficult to find attractive coordinating prints, and later I worried that the combinations I selected would be too garish. And I was right, but mixing muslin with the bright colors isn't really working either. For one thing, the muslin is going to get dirty really quickly. More than that, however, I just don't like the bright prints I chose.

On the other hand, I'm still liking my initial concept for the summer clothes. I love layers, especially tunics over trousers. And I can hardly wait to finish the little mock-wrap pieces because I know they're going to be really cute. But I promised my sisters I'd read this book for our sisters' book club, and I'm late. Must stop sewing and start reading. Quickly.

Incidentally, several people have asked me about the pattern I used for my skirt. I draft all my own patterns, so I'm afraid I can't give you a simple reference. On the other hand, if there's a lot of interest I would be happy to write a tutorial on altering a basic A-line skirt to add a scalloped hem. Leave me a comment if you're interested. I'll show you how to make my favorite no-waistband skirt treatment as well. They're amazingly easy and more flattering than a waistband, I think.

Wednesday, April 19, 2006

Glorious spring!

Wow, what a lot of nice comments you left regarding the skirt! Thank you.

I took the wrong camera when we went out this morning. Yesterday the baby took her first steps unassisted, and I wanted to record her in action. But it was really too windy this morning for toddling, and the kiddo wore herself out chasing the toy stroller as it blew away. Meanwhile, the spring flowers were fantastic! The colors and details would have been much better with the other camera, but this is what I have to give you. Sorry.

spring mosaic
And here's a little video of Bebe. It's really meant for Todd and the grandparents, since they're not around to witness it all, but we're happy to share if you're interested.

Tuesday, April 18, 2006

The skirt that had to be

There was a time, not all that long ago, when I kept makeup in my desk drawer. That was when I had both a desk and occasion to wear makeup. Back then, there were frequent events to attend in the evenings, and my wardrobe reflected those events: gallery openings, literary events at the library, museum parties, and drinks with friends.

These days my grown up, well-cut clothes hang in the closet, and my daily wardrobe consists almost exclusively of jeans and t-shirts (or capris and tanktops in the summer).


Back then I left work late and attended awards ceremonies at the library where Ethan Hawke and Uma Thurman read excerps from the nominated novels. These days I put the baby to bed early, make pasta, and knit while I watch the videos from those books made into films.

skirt1
But I'd like to dress up a little more when I am at home. After all, this is New York and I used to be a clothing designer; shouldn't my attire reflect those aspects of my life? So I'm in search of the perfect playground-going skirt; one that can slide down the slide and crawl under playground equipment while looking supremely chic, or at least a little bit more pulled together

This skirt is not it. It's slim, it requires dressy shoes, it's light colored, and there is no way I can wear it down a slide without disgracing myself.

skirt4
But I had to make it. When I saw the Japanese fabrics at Purl I knew it was meant to be, and I thought immediately of this photo. The skirt was predestined.

To hang in my closet, I guess.

Update: Erin, and anyone else wondering about the Japanese fabrics, you can get them at Purl Patchwork on Sullivan Street in SoHo. By the way, Purl is also offering bundles of select fabric on their website now. Unfortunately, no Japanese fabrics for sale on the website yet, but the online inventory is planned to expand soon, according to Joelle!

Sunday, April 16, 2006

Art of the Japanese Postcard

"The surge in postcard mail coincided with a much improved postal service; by 1890, U.S. city dwellers could expect a delivery two or three times a day."

jpccover
My jaw dropped when I came across that sentence in Leonard Lauder's preface to Art of the Japanese Postcard. Can you imagine receiving mail from the post office three times a day? I interrupted Todd at his blogging to tell him. He already knew that fact. (Todd always knows things like this, and once he knows them he doesn't forget, unlike me. I'm so forgetful I re-discover the same facts over and over again.)

jpc3
So let's compare postal service in 1890 to 2006, where I spend a minimum of twenty minutes in line every time I go to the local post office, and where I've never seen more than three windows open at a time, no matter how long the lines. Hmm. I would happily give up email if I could get mail 3 times a day. Heck, I might even give up blogging! Just think: Netflix turnaround might be reduced to a single day. And why would you need to drop someone an email message if you could send them a beautiful postcard that would arrive a few hours later?

jpc1
Anyway, back to the book. I first noticed it in a local shop several months ago and fell in love. Then Todd's parents sent some money for my birthday, and I decided this was how I would spend it.

jpc2
All the postcards in the book are from Leonard Lauder's extensive collection, which he has donated to the museum of Fine Arts in Boston. The history of these postcards is fascinating: the postal system in Japan was introduced in the 1870's. Since they were a widely available, inexpensive, fast means of communication, postcards quickly gained popularity and became a primary source of communication for approximately twenty years. Sophisticated printing techniques and presses that employed thousands of workers meant that beautiful lithograph postcards could be purchased at low prices, and many well-known artists of the time supplemented their income by designing these cards.

jpc5
But enough of the history (which is really interesting and worth reading); I wanted to show you this book because the postcards are so beautiful. I'm a sucker for good composition, and these little masterpieces are loaded with it. Many of them are from the Art Deco and Arts and Crafts eras, and they reflect those aesthetics filtered through a Japanese eye. The simple starkness of the layouts, the richness of the colors, and the beautifully printed and sometimes hand-embellished details of the postcards result in a fascinating book that could be examined for hours. I think this book will be providing a great deal of inspiration for me: quilt patterns, color palettes, even clothing styles could be inspired by this book. But enough blathering; you can see for yourself from some of the photos (click to enlarge).

jpc4

Tuesday, April 11, 2006

Fingers and toes

Back when I was in design school I volunteered as a dresser for some of the shows during fashion week. Basically, this meant that I helped models find their clothing backstage and change outfits between each appearance on the runway. It was a lot of fun to see the runway shows behind the scenes, and as a result of the work I was able to see some of the big shows (including Calvin Klein and Michael Kors) from the seats out front. Richard Tyler's show was my favorite. It was held in his enormous Gramercy Park mansion, and we sat on delicate gilt party chairs to watch the models descend the staircase and glide from room to room. It was a perfect opportunity to see his exquisite gowns up close.

At one show I dressed Eugene Hutz, who recently starred in the film Everything Is Illuminated (Did this film actually show in cinemas? According to the website, it's already been released on DVD. It's a great book, by the way.), who was at that time a hot new model sporting a big handlebar mustache.

I don't think Eugene had modeled before, and I didn't have much experience working as a dresser, so I wasn't sure about protocol. At one point I started buttoning a shirt for him, thinking that he would help and we'd get the job done sooner. Instead, he just waited for me to finish. Halfway through the buttoning I started feeling a little uncomfortable, like I was doing something sleazy. Ironically, Todd was also helping out that day, and he was just across the room busy searching for shoes for the female model he was dressing, since the shoes for her outfit had disappeared. He found another pair that fit and sent her on her way. Which I suppose just goes to show that maybe not all the outfits on the runway look exactly as the designer intended them. If the shoes don't match the outfit, that may not have been planned.

The irony of all that runway-going was that once I started actually working for the big designers, I didn't have the time, interest, or opportunity to see their shows. But it was fun to have the experience, and I still find myself thinking about Eugene's buttons and Richard Tyler's gowns now and then.

Kiddo and I had to go across town this morning, and virtually everyone we saw outside was wearing boots. They certainly are the fashion accessory right now: boots with tight jeans, with skirts and dresses, with knee-length trousers and capris. We even saw boots with a pair of very short, baggy, cuffed shorts. I like it all except for the tight jeans, which I think really don't look good on anyone, no matter how tall and thin.
puppets1
On a completely different topic (fingers), yesterday we received a lovely package from Suzie in Australia. She made Bebe some felt finger puppets and also included lovely fabric and trims in her package. The finger puppets are amazing, with beautifully stitched details. I think they'll be great with Bebe's Noah's Ark toy. Thanks very much, Suzie! You can see more photos here.

And now we're off to enjoy this sunny spring weather. I can't think of a better opportunity to catch sight of more quirky spring fashions, and probably even more unusual boot-and-clothing combinations, than a walk through the East Village. Can you?

Sunday, April 09, 2006

Tutorial: hand-stitched applique with freezer paper

Click on any photograph for an enlargement, and please let me know if you notice any mistakes or areas that need clarification.

1. Start by drawing a shape for your applique. If this is your first time doing applique you might want to try a simple geometric shape. A heart would be a great way to practice straight edges, curves, and both a point and an inverted point.


2. Copy your shape onto freezer paper. It is easiest to draw on the dull side of the freezer paper. Note, however, that the shiny side will face up when you make your applique, so be sure to reverse the image so it looks the way you want it to on the shiny side of the paper.


3. Then cut out the image along the edge and iron it, shiny side down, to the wrong side of the fabric you will be using for your applique. Your iron can be quite hot for this, but be sure to turn off the steam setting. The shiny plastic side will adhere to the wrong side of the fabric, making it easy to fold the seam allowances around the shape of the applique.

Once the freezer paper has bonded to the fabric, cut out the fabric leaving approximately 1/4" seam allowances. This doesn't have to be exact, since the freezer paper will guide you as you create your applique. I like to leave my seam allowances a little bit wider than 1/4" because the fabric tends to fray a bit as you are working, but as I reach tricky curves and corners I'll clip and trim the seam allowances as necessary.


4. It can be helpful to press your seam allowances to the inside before starting to sew the shape, but I don't usually spend a lot of time on this step. I think it's easier to fold the fabric under as you are sewing it. Other people's opinions differ on this step. I've read suggestions to use starch or glue stick to help keep the seam allowances in place before stitching, so you may want to try one of these other methods as well.


5. Since I was appliqueing onto a t-shirt for this demonstration, I used a fusible interfacing on the inside of the t-shirt underneath the applique. This helps to keep the fabric from distorting while sewing and also prevents the shirt from stretching too much in that area - a lot of stretch would put stress on the fabric and the stitches of the applique. If you are appliqueing onto a woven fabric, fusible interfacing will not be necessary.


6. Pin your applique shape into place. You are ready to start sewing.


7. You'll be leaving an opening on one side of your applique where you can pull the freezer paper out before you finish sewing, so chooses a side that will be easy to sew without the freezer paper in place, and leave that side for last.

8. Then knot the end of your thread and take your first stitch. It's easiest to start by coming up through the back of the applique fabric alone, at the fold line. Then start stitching through the base fabric.

The easiest and most invisible stitch to use for applique is a ladder stitch. I've tried to illustrate this stitch with the next three photographs. Essentially, you'll go into one fabric directly across from where you came out of the other fabric. In this way, the thread will draw the two fabrics together invisibly. Keep your stitches slightly underneath the edge of the applique so they will show less.


tutorial7


As you stitch, tuck the seam allowances underneath the applique and clip the seam allowances as needed. For corners, fold the tip of the corner underneath before folding the edges in. This will give you a sharper corner. Curves can be clipped if necessary, but be careful not to clip too closely or your fabric might start fraying at the edges of the applique. Experiment to find what works best for you. Inverted points will require clipping in order to fold the seam allowances underneath. Again, a little experimentation will help you feel comfortable with the method that works best for you. I try not to clip until I'm ready to sew that area to minimize the fraying problem.

9. When you've stitched nearly all the way around your applique and have a smallish opening left (1-3 inches, depending of the size of the applique itself), finger press the remaining seam allowance into place. Then use a tweezers or a blunt instrument (I often use a letter opener) to reach in through the gap and separate the freezer paper from the fabric. You can now pull the freezer paper out through the opening with a tweezers and finish stitching the applique into place.


10. You're finished! Press your applique one more time to help the seam allowances relax into place and to remove any wrinkles from the fabric. Now you can add additional applique, embroidery, or paint on top of your applique to decorate it.

Good sock, bad sock

Ack! I was so thrilled to be knitting my new socks on Friday night. At the last minute I changed my mind and decided to make the Falling Leaves socks, and after one false start I was amazed to find the first sock materializing on my needles; what a cool way to form the toe! But last night when I sat down to continue, I realized that something is seriously wrong. One side looks terrific, and the other side has big holes evenly spaced along the join. I can't decide what I've done wrong, so tomorrow I hope to find someone who can help me figure it out. Can anyone tell from my photos (click to enlarge - that's the top of the Eucalan bottle showing through where the pink is) what the problem is? I love the yarn and the color, and it's killing me to stop knitting for a while. I think I must be off by one stitch on that side, but it could also be a twisted stitch. Ah, well. I wanted a learning experience: here it is.

good side

bad side

Tomorrow's post will be written by a guest blogger. She'll be writing tutorials on goldfish crackers and on training parents to be early risers. Like 4 am early. Yup. Breakfast cannot wait until 6.

Thursday, April 06, 2006

Thursday = knitting. Or sewing?

Yesterday I had the pleasure of meeting knitting sensations Kay and Ann of Mason-Dixon. They made an appearance at Seaport Yarn for a book signing and project demonstration. I had never been to Seaport Yarn before, and I have just one thing to say about it: Yikes. No more on the topic. But you can read a description of the store in Kay's post.

I haven't had a chance to look very closely at their book yet, but I've heard so many great things about it. I'm already loving this:


Isn't it fun and colorful?

In other news, the mailman has been bringing lots of little treats to our house lately, including one of Alicia's sweet collaged canvases.


Thanks, Alicia!


And here is the Lorna's Laces sock yarn that Emily sent. I think it's so pretty, I could hardly restrain myself from rushing down to Purl to get long circular needles so I can teach myself the magic loop method for my socks. So I didn't (restrain myself, that is).


And here we are, yarn wound and ready to go. Those needles? Yeah. Size 0. I'm scared; they're as thin as the cable that holds them together, and I've never knit with anything smaller than a size 3 needle before. But I have decided that the Leaf Lace socks must be made. Bebe's socks are finished and I'm ready for a serious challenge.


But tonight, no knitting. I have some Japanese fabric from Purl Patchwork that is begging to be made into a skirt. Socks must wait.

Wednesday, April 05, 2006

More tools

Here are a few follow-up details to the tools post:


Suzie has written a nice post about the tools she values and the ones that I missed.

Allison and Linda rightly suggested that a seam ripper should be included in the list.

Several people have asked about the Spectra Paints. I've only been able to find them at Hobby Lobby stores, but according to the website you should be able to find these paints at other retailers as well. When I contacted the company a few months ago I was told they could probably sell the paints to me directly. If you don't live near a Hobby Lobby, you might want to email or call them to ask about this.

It also crossed my mind the other day that I should have added Freezer Paper to the list. It's great for applique, for printing directly onto fabric with an inkjet printer, and for creating stencils for painting on fabric (Amy did this the other day). And I suppose you could use it to wrap and freeze food as well? (I really wouldn't know; I keep freezer paper in the kitchen, but it's only ever been used as a craft tool at our house.) I'm sure I've also missed many other valuable tools. Feel free to add your suggestions, and I'm still hoping to learn about new tools that I should be using as well.

Tuesday, April 04, 2006

Art for the crafter

It's funny how relatively easy it is to get uptown and downtown in Manhattan and how comparatively difficult it is to get across town. Yes, there's the L train. But aside from being jam packed on its way in from Brooklyn, the L line also ends at 8th Avenue, which is a long way from the Hudson River and the art galleries in Chelsea. And forget the crosstown busses; you couldn't pick a more painful, insanely slow way to cross the island.


For that reason, I'm exceptionally grateful to the Phatory, Kerrigan Campbell, PS122, and Giant Robot for putting their galleries in the East Village. Were it not for these galleries, I wouldn't see art nearly as often as I do. Bebe and I often stop into Giant Robot on our daily walks, and almost every weekend finds the family on a jaunt to the Phatory en route to the dog run at Tompkins Square Park. There's nothing like proximity to encourage the regular enjoyment of art.

I've already been twice to visit Caroline Hwang's show, Wounded but not Broken, at Giant Robot. But it's not just the proximity that's drawn me to the show; the work is intriguing on many levels. Hwang work with layers of fabric, paint, and embroidery to build fascinating little pieces of narrative illustration. She explores the pain and melancholy of relationships through motifs of the mythical native American huntress, her teepee, arrows, and some awfully cute little bears in the forest.

Hwang's working process itself is intriguing; she seems to return to each piece many times during the process of making it. She stitches fabric in a sort of patchwork style, paints on fabric, adds applique, paints again, embroiders on top of paint, and revisits each medium many times so that each piece becomes a complex of interrelated layers. The work is intriguing from a technical standpoint, especially as a crafter viewing her creative process, but also from an artistic level.

In addition to these hanging pieces, Hwang is showing a couple of three-dimensional pieces that enhance her show; in the middle of the gallery she's built a small teepee with a fabric bear inside. Arrows pierce the walls of the gallery above the teepee as though the huntress had stalked the bear and left her victim in the gallery. The window of the gallery showcases another small forest and wildlife vignette.

You can see images of the entire show here. Or course photographs can't do justice to her work, but if you can't see the show in person you can at least get a feel for Hwang's work.

Monday, April 03, 2006

Poisson d'Avril

In France, the first of April is called Poisson d’Avril, and pinning a paper fish on an unsuspecting friend’s back is considered the height of hilarity. (Yeah, I don't get it either.) Anyway, I was planning to celebrate Poisson d'Avril this year, but my fish wasn't ready until Saturday night. Blame it on the illness we suffered last week. So I celebrated yesterday.


The first fish was a little too cartoony for my taste once I had finished the applique and started the embroidery. So off he came. The second fish was rather touch-and-go when I started painting it; the spines look more swordfish than goldfish, and I'm still not sure I like them. But a little more applique and embroidery helped the effect.


So happy Poisson d'Avril to you.

Oh, and have you seen Knit and Tonic's photo of her yarn stash?